ZaTask Project Management App
Contact me to view the demo mode of ZaTask or Sign-up and use ZaTask. It's fantastic.
Table of Contents
Why did I develop this? What were my goals? What tech stack was used? What did I learn? Frontend Javascript Fetch and Promises Login system Cookies React React Router Servers and API Express Building and configuration API development Webpack NPM scripts Git Hosting Linux admin MySQL Valkey PM2 Security Email Testing ZaTask homepage What challenges did I face? And how did I overcome them?Why did I develop this? What were my goals?
I wanted to develop a full-scale, professional SPA and put it on the internet for everyone to use for free. It's where you learn the most. In hosting a website, you learn so much in terms of traffic, web hosting. It opens up possibilities.
I wanted to get a Linode box for multiple reasons: to put a reverse proxy on, my MasterFind website and future projects. I wanted a low cost box out in the cloud. It's nice to have.
The login system can be used for other apps I do so it's a good use of time to do a very good Login system and it's a good learning experience.
I used Trello and they have a limits on my usage and I wanted to use a Trello-type Project management app but with repeating tasks and links to tasks which ZaTask has. I use ZaTask to plan my projects and to schedule my days. I find it extremely useful. I learnt from MasterFind that to market this is a whole lot of work. It's a full-time job. I've been through that. I'm not trying to make money from this. That's a whole new job that I don't want to do.
I wanted to get my hands dirty with Redis - Valkey, Nginx, MySQL, rate limiters, a reverse proxy and other things on a real app. And to get my hands dirty with Linux admin. I wanted my own Linux box.
I wanted to do another good project with React.
I wanted to have a good project to show prospective employers.
I wanted to understand the various types of cookies some SPA's use. How they are used for identification, authentication and tracking.
Before developing ZaTask, I had different prototype versions but they never worked well enough. The first version had it all stored in one big JSON string stored on Firebase. The layout wasn't right and scroll was a problem. I was experimenting and learning in the early versions. I changed the layout and went with the more conservative, tried and tested layout that it is now. I always needed this type of taskboard app but the commercial apps had restrictions and I wanted to make my own app with features I wanted.
What tech stack was used?
Frontend
React
CSS
HTML
Sass
ITCSS
SVG
Jotai
Material UI
ITCSS
For the frontend, React made the most sense because it makes everything easier.
I used various libraries such as Jotai (state management), react-smooth-dnd (drag n drop), react-toastify, react-icon libraries, simplebar-react (a scroll library), ffmpeg (for video) and many more things.
I had to make a decision between using react-smooth-dnd which is based on HTML5 drag n drop so it would work on mobile but uses render props or use a newer drag n drop library that uses hooks. I wanted ZaTask to work well on mobile and didn't know how long before I would develop the app for Android. So I went with the react-smooth-dnd. I'm very happy with the decision because ZaTask works really well in a mobile browser. It wouldn't work at all if I went for the newer library.
Servers
Linux
Node.js
Express.js
MySQL
Redis
Valkey
Webpack
Git
Github
Nginx
Linode
Passport.js
express-session
Low cost was a major consideration and considering I won't spend much time on marketing ZaTask, I don't expect huge traffic early on. Linode was my choice for hosting because I wanted low cost and a box on the cloud I could do multiple things with. It only costs $8 AUD per month. Even though I need to administer everything myself, it's still worth it. I have a webserver, MySQL, Valkey and other things.
Valkey-Redis was used to make ZaTask fast to flick between boards. It's a good tradeoff of fast and low use of data in the server cache.
Node and Express were used because I know them well and Express has been battle tested for years.
I wanted very strong security and so I didn't want JWT tokens for the login process. I wanted session store. Passport.js, Valkey and express-session help here.
Nginx was chosen because it's the the premium web server.
I chose Webpack because I know it. And as far as I know, it's the best, even though it can take time to get right.
Other technologies used - fail2ban, bcrypt, Morgan, Winston, Chart.js, Cloudinary, PostHog - analytics.
Website
CSS
HTML
Sass
ITCSS
SVG
Testing
Jest
Puppeteer
Other libraries and tools I used
Security - bcrypt, fail2ban (security), UFW (Linux firewall).
Email - Nodemailer, express-handlebars, MX Route (email service), Chart.js, Cloudinary.
Logging - Morgan, Winston.
Miscellaneous - PostHog (analytics), certbot and Let's Encrypt and many more things.
My Linode box is a Linux VPS. I have done all the Linux admin myself.
What did I learn?
I could spend several days describing the lessons I learned while working on this project. I'll just name a few major lessons.
Frontend
Javascript
If you have an event on a div, it won't fire because it's not focusable. But if you put tabindex="1" on it, it will fire. Some elements are not focussable by default eg div, article.
If you press F5 on a browser, you get a 304 Not Modified. It means it grabbed it from cache. Shift F5 is 200, it skipped cache and fetched. But 200 doesn't always mean it was a full request but it may be. It may be cached, or not.
Fetch and Promises
Fetch returns a Promise which when resolved is a Response object. .json() specifically is a method of the Response object. .json() returns a Promise which when resolved gives you JSON data.
Fetch should always be used with a catch for the cases when the user has no internet or when the destination server is down. try/catch is for synchronous code. Don't use try/catch if you use .catch with fetch. Catch in try/catch is not ignited if it's ignited in .catch of fetch.
Browser HTTP connection timeouts
Fetch in the browser checks:
1) internet connection - if no internet, immediate response in browser (if .catch() is used with fetch).
2) ping server - 3 second timeout - if ping failed - no response is given in the browser, the browser times out in 3 seconds.
3) Path wrong - 404 - fast response
4) Path good, cors failed - 200 fast response, fetch.catch() error, browser displays cors error.
5) Path good, cors good - if the responds is within the browsers timeout period - 200 - SUCCESS, otherwise you get a timeout created by the browser. The browsers default timeout period can be uncomfortably too long. And there is a limit on the number of connections a browser can have opened ie awaiting a response.
In Chrome, there are several timeout defaults. See about:config. There are settings like server.keepAliveTimeout - amount of time server will wait and keep the connection open after last response - the default is 5 mins. network.http.connection-timeout is another timeout.
Fetch allows us to check that a response has been received. We can't have a condition on the response with form submit. Because of this, a form submit may take too long to response if the server is down. Form submit assumes the server is always up. Fetch needs a timeout less than what the browsers uncomfortably long default timeout period is.
Fetch in the browser is doing some sort of surface level check on the server like a ping. If there is no response, it gives a 3 sec timeout. Forms don't do this. There is no way to do a conditional response with forms, if the server is down, it times out. This is why I have created some code in forms to check first if the server is alive, to emulate this behaviour with fetch. Forms and the form submit event were designed in the early days. That's why they don't have the CORS headers. Forms assume the server is alive.
Fetch in the browser adds referer, origin. Normal browser port 80 URL request doesn't.
The server needs to specify permissions for HTTP connections with CORS headers. They can do it on the server via code something like this:
res.setHeader('Access-Control-Allow-Origin', req.headers.origin);
res.setHeader('Access-Control-Allow-Credentials', true);
res.setHeader("Access-Control-Allow-Headers", "Origin, X-Requested-With, Content-Type, Accept");
Forms
Forms and formdata were created before CORS headers existed. They don't add CORS headers. But fetch within a browser adds "Origin" to the request header. With forms, you don't have any CORS header issues with the server. You don't even need Javascript to use forms.
Advantage of form submit vs fetch
- No Javascript needed. It's easy to implement.
- No CORS issues
- Response is the whole page
- It can do some checking with attributes like required
Disadvantage
- Page reload, it's not optional
- It can't catch errors
- Fetch has much more flexibility over HTTP methods, headers etc
Forms name attribute is how email addresses and passwords are remembered in the browser.
With this field:
<input type="text" name="street-address" autocomplete="street-address">
On successful submit, the value gets saved in the browser to "street-address" (if the user opts to save), so if you have a field any field with the name attribute as "street-address", it will appear as an autofill value.
Form sending with a GET method sends data in the URL with this Content type - Content type - text/html; charset=UTF-8
Form sending with a POST submit sends with data in the body with this Content-type - Content-type: application/x-www-form-urlencoded.
Form events
When there is an event on the actual button as well as events on the form such as submit and a formdata event, this is the order of events running:
elBtn.addEventListener("click", .....)
elForm.addEventListener("submit", .....)
elForm.addEventListener("formdata", .....)
In the formdata event, you can change the form data using formData methods. I used formData.append to alter the login data.
Each events function goes on the stack, the functions go on the stack in the order the functions are called. If there is asynch code, that async code will get run after all the code on the stack.
If there is asynch code in the first event, elBtn click, that async code runs after elForm.submit() because elForm.submit() gets put on the stack and only when the stack is empty, it runs the async code. When there are multiple events with one click, this happens. It can be confusing at first. This is different to how Express middleware works.
elLoginBtn.addEventListener("click", async () => {
    console.log("elLoginBtn - click - start")
    async fn()
    console.log("elLoginBtn - click - end")
}

elForm.addEventListener("submit", () => {
    console.log("elForm - submit - start")
}

elForm.addEventListener("formdata", () => {
    console.log("elForm - formdata - start")
}

async function asynFn() {
    console.log("asynFn")
}
Output would be:
elLoginBtn - click - start
elLoginBtn - click - end
elForm - submit - start
elForm - formdata - start
asyncFn
If that's a problem, you can do the following using e.preventDefault() and conditions with elForm.submit().
elForm.addEventListener("submit", (e) => {
    e.preventDefault()
    if (elPswd) {
        elForm.submit()
    }
})
There is no error detection for form.submit(), there is no equivalent to fetch(....).catch(). So I wrote one. You need to create a simple test endpoint to see if the server is alive. The serverAlive() function checks that the endpoint is responding with json.
elForm.addEventListener("submit", async (e) => {
    e.preventDefault()

    if (!elEmail.value || !elPswd.value) {
        elWarning.textContent = "Fill in your email and password"
        e.preventDefault()
    } else {
        await serverAlive().then(result => {
            if (result) {
                if (elEmail.value && elPswd.value) {
                    elForm.submit()
                }
            } else {
                elWarning.textContent = "An error occurred. Please try again"
            }
        }).catch(err => {
            elWarning.textContent = "An error occurred. Please try again"
        })
    }
})
To cancel form submit, it needs to go on the first submit event, either the button login click event or the form submit event. It can't go on formData which would be the last event.
elLogin.addEventListener("click", async (e) => {
    e.preventDefault();
    ....
})
To see if a text field is empty - if (elFirstname.value.length === 0)
Middleware can take async functions and execute them till they finish unlike events. So when middleware runs and it has asynchronous code in it, it will finish before moving on to the next middleware. Unlike event sequences.
I created specific middleware to do specific checks. Variables needed to be passed down. To pass variables down from middleware to other middleware or to endpoint body, use res.local.
Login system
I spent a lot of time creating a strong login system developed with high security. I used Passport.js. I've developed error detection within my forms.
I did in-depth studies of logins systems of large SaaS software and large apps like Facebook, SalesForce. I studied their forms, field attributes, how they use cookies, sign-up forms, forgot password forms, how they make it difficult for hackers and various other things.
If you have multiple ZaTask tabs opened and you log out of one tab, all tabs will log out. A localStorage event listens for this and adds a URL ending with /continue=xxxx to all zatask.com tabs. When the user logs in again, the other tabs log back in to the previous page they were on by looking at the location bars /continue=xxxx parameter. The redirect is done with useEffect.
A honeypot is a first stage of security for forms.
Cookies
I've used various cookies:
- browserId (not deviceId because you could have different browsers on the same device)
- user mode
- login states
- security
- other cookies
Browsers have different processes for each tab. This is called sandboxing. If you have 10 tabs opened, there will be 10 processes for that browser. It's done for several reasons including security. However, the same type of browser can share the same cookies based on the domain, path and key. Two different instances of the same browser on the same machine. eg Two Chrome apps opened on the same machine share the same cookies. But Chrome and Firefox together on the same website can never share the same cookies. Cookies are not device specific, they are brower specific.
React
Inline styles in JSX are good until you need to:
A controlled component has state controlling its value.
The virtual DOM is a superpower. Change the state, don't change the DOM. Change the state and the brilliance of React efficiencies will take care of the DOM.
People get the Virtual DOM and the Shadow DOM mixed up. The Shadow DOM is more about encapsulation of CSS. They are unrelated.
Reacts reliance on functional programming is a good thing. Don't use push in arrays, use [...arr] or concat.
React only focusses on the View part in MVP.
Using a javascript library that isn't written in React doesn't work. The library needs to be written in React. Javascript libraries often need to have a React version. My Dropdown field is javascript code. It needed to be converted to React. Well tested UI libraries are a better option. I chose Material UI.
Trying to make your own UI component is too fidgety, especially when its more complex like a drop down list.
key is a way for React to know what changed. If keys in React are the same in sample data, it makes it a real nightmare to test. Keys are so important. Get the data right for keys.
react-icons is easy to install and use but its got icons that you don't use. It's too big. I extracted the SVG out of it for the icons I wanted and made each SVG icon a component for reuse. I can style this SVG. The library is about 6Mb, even if you just need four icons from it.
useEffect order for shared state is always children first. Keep this in mind to know where to put things, and in ordering useEffect. useEffect doesn't care if the function takes a long time or a short time to execute.
useEffect runs twice in development mode. It mounts twice to detect errors.
lazy() is so fantastic. It splits code into bundles and it is so easy to work. <Suspense> is like a placeholder.
const Homepage = lazy(() => import("./components/Homepage") )
This returns a Promise of a component which React Router needs. lazy takes a function that returns a Promise. It expects an object with a default key { default: Component }.
Suspense will give a fallback while the component is loading in the network tab.
React Router
ZaTask dynamically creates routes. I learnt a lot about this.
<Navigate> can be used within </Router> and is like useNavigate.
<Link> is just like <a href...>. <Link to=""> matches with <Route path="">. <a href=....> won't trigger the route. But state is not linked to it.
It doesn't update a state if the Component is already open. I can update state of a component that's already open if the component function argument changes by:
useEffect(() => ....., [ arg ])
If you paste a URL such as https://zatask.com/board/LweIiiRu/MyBoard into the browser, it hits Nginx first, which forwards to React Router (App.js). State gets updated via useEffect(() => {....}).
There are some differences in regular expressions in Nginx and React Router work so it can be a tiny bit tricky to configure each to match your desired result. Nginx doesn't have a lot of regular expression flexibility.
When you refresh a page, the URL needs to be handled by both Nginx and React Router. Nginx is first, it hands it off to React Router. Nginx decides which html file will be the base file.
Servers and API
I've listed a few of the many server related things I learnt doing ZaTask.
Express
An API was developed for ZaTask using Express. Authentication was handled seperately. High focus was on error detection and creating good foundations for future development.
Fetch in the browser adds referer, origin and some other CORS headers.
To manage CORS header permissions, it needs to check Access control and before it reads credentials needed to send cookies.
res.setHeader('Access-Control-Allow-Origin', req.headers.origin);
res.setHeader('Access-Control-Allow-Credentials', true);
res.setHeader("Access-Control-Allow-Headers", "Origin, X-Requested-With, Content-Type, Accept");
require() is synchronous. It uses readFileSync. It checks the cache to see if it's there, if not, it loads it and calls module._compile. It returns module.exports. Require can cache modules as objects.
express.json(), .text(), .urlencoded() etc look at Content-Type. If type is wrong, it won't work. express.urlencoded() must be application/x-www-form-urlencoded which converts form data to an object in req.body. express.json uses JSON.parse().
return doesn't stop execution in an endpoint.
res.end - stops processing.
res.send - continues processing what's below it.
There are 301 and 302 redirect. 301 redirect puts something in the browser to remember to redirect it, to clear this 301 redirect, the client must clear the browser data for that page. It's called a 301 Permanent redirect. res.redirect is 302.
Making 2 Set-Cookie statements in one response creates problems. To set multiple headers in one response in Express, use setHeader:
res.setHeader("Set-Cookie", ["cookie1=1", "cookie2=2"])
Axios stores result in data property.
ESM and Common JS
With ESM, imports and exports are known at start time. It's static. Treeshaking can happen because of this.
commonjs - you can import and export as the code is running. You can change the imports and exports as the code runs. It's not static. No treeshaking can happen with commonjs.
ESM can read both commonjs and ESM, commonjs can't do that. It existed before ESM. So I made a settings file in ESM because I wanted one place for settings that can be read by the server and also be able to be read by Webpack to be compiled with the React code.
Middleware
Middleware is the second argument. And you can have as many middlewares as you want. Eg.
app.get("/endpoint1", middleware1, middleware2, middleware3, middleware4, (req, res, next) {
Middleware can take async functions and finish running them before it moves on to the next middleware, unlike events.
Middleware doesn't return a value. To pass variables between them, use req.local. They need next() to continue. return doesn't stop execution in an endpoint.
When using next(), you can put a message in, eg next(err), err would become the message property of the Error object.
Promise chains
After several rewrites, most of the endpoint code uses Promise chains. This was probably my best lesson of this project. Promise chains are beautiful to work with once you know how to use them with error detecton. I did a deep dive into Promise chains before I re-wrote the endpoint code.
Promise reject goes to the nearest catch(). .catch() gives the opportunity to fix things in the chain so it can continue to the next .then() below it.
throw() is older. It works with try/catch and .catch(). It's best with synchronise code.
The second argument of .then() method is also a callback, but it is an error handling callback. It will be called only when some Promise higher in the call chain throws an error which doesn't get caught and handled before. .then() will always call only one of the two callbacks. If everything goes right, it will simply call the first callback, as usual. If there is an unhandled exception higher in the chain, it will call only the second callback.
Both the first argument of .then() and it's second argument are optional and have default values.
Default values are:
result => result
error => throw error;
Errors get passed on down the chain.
What does catch() do if there is no Promise reject?
const somePromiseWithCatch = Promise.resolve(5)
.catch(error => console.log(error);
It just passed the value through it. So catch is like .then() but without the first argument. .then(result => result)
These 2 work the same way:
somePromise.catch(error => {
    /* somehow handle the error */
});

somePromise.then(undefined, error => {
    /* somehow handle the error */
});
Promise reject goes to the nearest catch. catch() are also a way to recover. So they continue to run the .then()'s below it. .catch() gives the opportunity to fix things in the chain so it can continue.
The optional chaining operator (?.) is fantastic. If I have obj?.prop, if obj is undefined or null, it won't try to process prop.
Authentication
I learnt how to use Passport.js and how it works with express-session and Redis-Valkey.
Bcrypt was used to hash the passwords. Cryptography is for security. Encoding is for transporting data. Encyrption can be one way, symmetrical. Bcrypt is encryption - one way and can be decrypted but depending on the strength of the salt and power of the computer, it can take a long time to decrypt.
Hashes generated by algorithms like SHA-256, SHA-512, and MD5 cannot be decrypted because they are one-way functions. These algorithms take input data and transform it into a fixed-length output (hash) in a way that cannot be reversed.
Error detection
I created a very nice error detection function and procedure. It works with the Error object to help diagnose errors.
The native Error object has the unique stack property which is extremely handy for debugging. The message property is also handy to use. stack is extremely useful for debugging and is usually used in error handling.
next(error_msg) and new Error(error_msg) put the error message into the .message property of the Error object.
next() vs throw new Error()
next(new Error(....)) vs throw new Error(....)
throw is older. It works with try/catch. It's best with synchronise code. It stops execution. It unwinds the entire function call stack, ignoring any functions you have on the stack. It's best to use when there could be a possible error, eg:
JSON.parse("undefined"); // SyntaxError: Unexpected token undefined
It’s a good idea to wrap JSON.parse with a try/catch block.
The Error object has two especially handy properties essential for error handling - message and stack.
new Error("this error message goes into .message") puts the text into message or the Error object so if you want to pass an object to it, use JSON.stringify.
In middleware - The err of - errorHandler(err, req, res, next) is the native Error object.
I have used Morgan and Winston to help with log formatting.
Building and configuration
API development
I created three environments - Development, Staging and Production.
Scripts and files were made for these environments eg .env-develop, .env-staging, .env-production. The code for it is easy and standard:
const path = require("path")
const dotenv = require("dotenv")

if (process.env.NODE_ENV === "development") {
    dotenvPath = path.join(__dirname, "..", "..", "..", `.env.${process.env.NODE_ENV}`)
} else if (process.env.NODE_ENV === "production") {
    dotenvPath = path.join(__dirname, "..", "..", `.env.${process.env.NODE_ENV}`)
}

require("dotenv").config({ path: dotenvPath })
I found it really convenient when converting code between development, staging and production modes to use a bash script. I also used bash scripts to manage versioning of CSS and Javascript files. Versioning was essential so that updated CSS and Javascript files are used on the frontend and previous version CSS and JS files are not used. Version numbers are used in the file names and bash scripts update the version numbers. It's easy to update. I update the version number variables in bash scripts and do Find/Replace in VS Code. Very similar scripts can be used for similar frontend projects.
Webpack
Webpack's default is commonjs because Node.js is commonjs. Webpack looks at package.json to see what format is set as. In package.json, type: "commonjs" is the setting. If type isn't in the package.json file, the default of commonjs is used.
There are a lot of good packages written in commonjs that will never be written in ESM.
DefinePlugin and EnvironmentPlugin are used to feed in the environment variables.
To set environment variables:
plugins: [
    new webpack.DefinePlugin({ "process.env.NODE_ENV": JSON.stringify("development") }),
]
NPM scripts
Even though package.json can't have comments in the file, there is a way around it for splitting up your scripts into different types of scripts to give some structure to the npm scripts. Eg
"/-": "=================== CSS ===================",
"build:css": "sass style/index.scss:build/index.css"
"//-": "=================== SERVER ===================",
"watch:server": "NODE_ENV=development nodemon ./dist/server/index.js",
"build:server": "./build/build-server.sh",
"server": "NODE_ENV=production node ./dist/server/index.js",
Npm scripts always run with the root directory as the one with package.json in it.
If the build gets too complicated, write a bash script. It can be run on both Windows and Linux.
node-mon restarts by listening to exit status. onchange, sass, node-sass all listens to file changes. Listening to processes stopping is much harder. It's operating system specific. And there are child processes. It's a specialist job. You need something like PM2 for that. To restart on process.exit() is a specialist job. PM2 is designed for this. PM2 is Node specific. It assumes 'node .....'. PM2 has an object property to set environment. PM2 has no way to restart for file changes but restarts on errors, that's how it's different to nodemon etc.
Git
I used a standard Git workflow where I used three main branches - main, develop and features branches.
You can get access to repo's via HTTP or SSL. SSH is easy and more secure than username/password.
To clone a private repo you need a personal access token, the format is:
git repo https://<PERSONAL_ACCESS_TOKEN>@github:<USERNAME>/<REPO_NAME.git> </REPO_NAME.git>
I could've developed the API fast if I was much more clear and specific about the data types for each endpoint. I could've focussed on just a few of the main endpoints first and created various tests for each endpoint and tested them with curl and/or Postman. More is discussed in the last section.
When building, you can get errors caused by links to other code like style sheets. You can also get them caused by the URL. At first, it's hard to figure out at first. Eg https://mydomain.com/board/ is different from https://mydomain.com/board (without the / at the end). needed to go back one directory, using try_files
It can be solved by using a CDN early on for absolute references or in Nginx by: try_files / @fallback;
Hosting
I chose Linode as my host. I have a VPS. I wanted to have my own hosted box. Even though I have to do all the Linux admin, it gives me flexibility and it's cheap. I have other websites hosted on this box eg MasterFind, a reverse proxy server and other things.
Redis stopped being open-source during development so I used the forked Valkey.
Linux admin
I did all the Linux admin myself.
I did the DNS and MX records.
Some of the Linux admin tasks I did.
- File and directory Permissions
- PM2
- Nginx
- Database admin - MySQL
- Security and Log file maintanence. I used logrotate.
- Email security
- Firewall
- HTTPS certificate maintanence
- Also some major things (mentioned below eg Nginx, Database admin)
I learnt about log file management - logrotate.
Log files are for security, not for web analytics. Web analytics tools uses a <script> tag rather than reading log files.
Nginx
Nginx can't do anything fancy with cookies. It can't do basic increments. Do that sort of thing in Node. Nginx is fast. And also, it can read cookies the browser can't read like HttpOnly and secure.
I always wondered how Facebook could serve a different homepage with the same URL depending on whether you've logged in before or not. I worked it out. It's done using a cookie variable in the location path. It's like Github and different branches having different files with the same location. To do it in Nginx, a root path needs a cookie variable in it, eg root /srv/http/mydomain.com/$login_mode;
res.redirect and Nginx rewrite are both a 302 temporary redirect. A 301 is a permanent redirect. It is information in the browser and the browser immediately does a redirect. So the browser is doing the redirect. It checks it's cache before the Http connection is made. It must be an agreed upon convention.
There are some Nginx configurations that are pretty standard. I don't like the www in the domain name, I prefer to keep that away because it distracts from your brand name. Most sites thesedays don't like to show the extension eg .html. All these configurations have been added.
I had to learn some Nginx regular expressions for matching the paths of common paths hackers use to hack sites like Wordpress /wp-admin and to scan for sensitive information eg .env. These blocks have been put in and I need to check the log files sometimes to see if anything is getting through. I learnt about rewrite, redirect, add_header, try_files and proxy_pass.
try_files - rewrites url but keeps original there in the browsers location bar.
rewrite and return - redirects. rewrite is 302 status code.
return - finishes execution.
I learnt about registering and configuring an SSL certificate. I used certbot and Let's Encrypt.
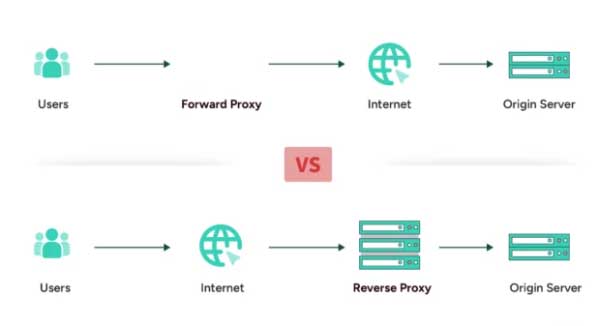
Nginx is great as a reverse proxy. I've added a reverse proxy to my box. A reverse proxy is after the cloud, not before like a forward proxy. This picture shows the difference between a reverse and a forward proxy. A load balancer or a rate limiter are examples of a reverse proxy.
MySQL
I am fluent at SQL but had to brush up on a couple MySQL things. PostgreSQL has some nice features I wish MySQL had.
I prefer camelCase for SQL field names.
Valkey
Valkey is used for rate limiting and to make ZaTask faster. It's a great tradeoff between speed and server cache usage. I also have some further plans for other uses.
Identifier makes it easy to hide the primary key. Identifier to primary key is a one-to-one mapping stored in Valkey. So it makes the app much faster. Eg for the ZaTask URL https://zatask.com/board/HIpUWHJb/MyBoard, HIpUWHJb is a board Identifier, this is stored in Valkey to quickly find the boardId, this makes it much quicker and also keeps primary key Ids hidden from the user.
PM2
PM2 doesn't work like Node.js. You have to know how it works. process.argv can't be done with PM2. PM2 args from process.argv are:
0: C:\Program Files\nodejs\node.exe
1: C:\Users\me\AppData\Roaming\npm\node_modules\pm2\lib\ProcessContainerFork.js
It was a real challenge to run my server processes without needing to run it under root account permissions.
PM2 can't change NODE_ENV in --node-args in the CLI. PM2 has an object property to set environment. PM2 is Node specific, it assumes node ....... PM2 has no way to restart for file changes but restarts on errors, that's how it's different to nodemon etc.
Security
I had some brute force attacks pretty immediately after I went live. I acted immediately. After looking into it, I decided to use custom rate limiters. Because login and sign-up are less time sensitive, I'd rather not use server cache so I am using MySQL rather than Valkey. I have set various time limits on the rate limiters.
Brute force attacks are done by software that makes it easier, with word lists that have common passwords. The software uses the browser and intercepts the Http connection before it goes out to the internet. You can change the request. It makes it easy to look at request body and spot patterns in the response eg response code, size of body etc. Brute force attacks are easy to protect against as long as you do some basics right.
There have been major breaches of security and email lists can be bought on the dark web so hackers have the email address, they just need the password. And because users often use the same password for that same email address, hackers use brute force with a dictionary to find passwords that will possibly get them access to more valuable things. They will even brute force small apps like ZaTask. Brute force attacks can go on for years. There is no way to stop them, they do a small number of queries a day. They use IP farms to get new IP addresses so there is no point blocking the IP address. If you check the security tab in Hotmail, some IP addresses are doing two or four attempted logins a day, for years. They got my email address from an Optus hack.
A number of strategies must be used always to mitigate brute force attacks including rate limiting, firewall blocking and captcha. Captcha just helps stop brute force attacks getting out of control. But captcha is annoying for the user. Security is the responsibility of the app, not the user, so use it sparingly. And it's a different issue for big tech vs a small app.
Denial of service is stopped via Nginx.
fail2ban has been added. If a honeypot fails and rate limits reached, ZaTask sends out Http error status codes that will be picked up by fail2ban. Too many bad HTTP status codes and fail2ban will block them. If they look like a hacker and keep looking like a hacker, they will get blocked. If you fail a honeypot, not even the silliest user can do that, only a hacker. Be very forgiving for non-hackers, be ruthless for hackers. That's the approach I'm taking.. If you are looking for /wp-admin, I don't have that on my site, you're a hacker.
Cryptography is for security. Encoding is for transporting data. Encryption like bcrypt is one way, symmetrical.
I don't want to land in the Junk or Spam folders when users sign-up so I had to really look into all the steps of sending emails and the best way to send emails. I decided to use MX Route as my email host. Sending email is much harder than receiving email. Hosting your own SMTP service is a lot of work. You must build trust. You are responsible for the reputation of the server so you don't get blacklisted and end up in the Junk folder everywhere. It's hard work, time consuming. I would rather outsource that, it's so cheap. MX Route was my preference. They are cheap. These internet providers whether it's email services or hosting have to choose their clientele. I am not allowed to use MX Route to send marketing (spam) emails. That would make them lose their reputation an therefore get blacklisted on some major email servers eg Gmail. And as I found out when I received brute force attacks, some ISP's provide hacking farms where it's very easy to get a new IP. Bluehost and some major hosting companies don't allow explicit material on their sites because their IP can get blocked and ruin it for other customers. There are hosting providers that specialize in certain types of operations. There are hosting providers that specialize in AI now.
PostHog - analytics
Log files are for security, not for web analytics thesedays. Scripts in the page are for analytics. PostHog is the service I use. Like Google analytics, but PostHog looks exciting.
Domain registration
Some webhosts have ways to scam customers who don't know better. They charge for "Domain Protection", something that should be free ie the WHOIS database doesn't show your contact details to stop spammers, it shows the ISP contact details. And GoDaddy etc charge you too much. SSL should be free or low cost, they charge $100. The Domain Registrar maintains the name servers. The name servers hold the DNS.
Email DNS - I learnt a few things about DMARC, DKIM, SPF records for email in DNS.
Testing
Testing Node within VS Code is so much better. I became fluent at that.
I extended my unit tests on my utils library to further improve my utils library. It's pretty bulletproof now.
I did some E2E scripts with Puppeteer. Some of these scripts are relatively generic and can be used for other app development.
I've created other scripts that test login including Puppeteer login scripts.
A layered approach should've been used to test endpoints early on. I should've started with basic API features, with thorough testing of those basic features using curl, even before any frontend functionality is built. Simple, specific endpoint functionality and building from there. Those scripts could be saved for later use. As further API features get added, write curl tests to test those new features. Then frontend tests. This layered approach in building tests is better when developing an API. Curl is easy when you know some basics. To add multiple headers: curl -H .... -H ....
Test procedures are continually improving.
I learnt how to use the touch events.
I realised that some test procedures need to be based on three device types:
- Keyboard only - mouse and key events, no touch events
- Touchscreen - no mouse events, only touch events
- Keyboard and touchscreen - mouse and touch events
For mobile you want to test for both Android and iPhone.
Other testing environments to test for - wifi and mobile. Mobile data often isn't IPv6 compatible. I had that error.
When doing a Jest screenshot, it resets DOM, didn't predict that. Each character put in to an input box, I needed to do it with Promises. I couldn't really foresee that.
ZaTask homepage
I created a video to put on the homepage. I looked into the best ways to put video on a webpage and the best ways to create the video.
I learnt the best practices for optimising video streams on the web. I used OBC to record video and ffmpeg and VLC to convert to other video formats.
I used three video formats:
- mp4 - h264, avc1
- webm
- ogg
Steps I used to make a good app demo video and putting it up on a webpage:
1) Make a good video with a good story to tell.
Use a small screen size to make the file smaller.
2) Create different file formats to support different browsers.
Use ffmpeg. Set it to around 10fps to reduce file size.
Have 3 encoding versions - mp4 (avc1), webm, ogg
ffmpeg isn't doing ogg well. VLC may be able to create an ogg.
3) Create <video> code.
Have it as autoplay and loop. Play it as page loads.
<video width="700" height="357" autoplay="autoplay" loop="" placeholder="images/pr6.jpg">
    <source src="pr6.mp4" type="video/mp4; codecs=avc1.42E01E,mp4a.40.2">
    <source src="pr6.webm" type="video/webm; codecs=vp8,vorbis">
    <source src="pr6.ogv" type="video/ogg; codecs=theora,vorbis">
</video>
autoplay doesn't really work. An event needs to start the video on page load.
document.addEventListener("DOMContentLoaded", () => {
    const elVideo = document.querySelector("video")
    const promise = elVideo.play();

    if (promise !== undefined) {
        promise.then(() => {
            // Autoplay started
        }).catch(error => {
            // Autoplay was prevented.
            elVideo.muted = true;
            elVideo.play();
        });
    }
})
What challenges did I face? And how did I overcome them?
The biggest lesson was in developing the API endpoints. I didn't know the intricacies of Promise chains and Express middleware well enough. Specifically, in using them with some error detection I had written. With a larger code base in each endpoint, that's what made it difficult. Some things in this project were new to me and I didn't foresee the difficulty of something that seems simple.
I could've developed the API faster if I was much more clear and specific about the data types for each endpoint. It has been a very good learning curve because I now know some good practices of developing an API.
When I develop API's in the future, I will start with a few basic endpoints and be thorough on the specs and use Swagger or apiDoc. I will start with only Curl and/or Postman. I will write tests to fully test each endpoint. Tests can be written even before any code has been written. I could do mock tests with mock data very early in the process. I can now do faster development and better testing. I now have a very strong understanding of middleware and how to write endpoints. I now have some very good error detection procedures and functions. I will try to develop a project with only a few endpoints first and try to only add endpoints as I need them, in more of a layered approach. Testing will go along with that. This has also been mentioned in the Testing section.
It was really difficult getting PM2 to run in non-root mode. It took several attempts and drilling deep into file permissions. logfile permissions, web file permissions, app permissions and other file permissons to finally be able to get it running as non-root.
Nginx testing and debugging was difficult. It was difficult to be sure which endpoint was hit. I started using a text response with Curl to be sure I know which endpoint was hit.
When testing on my phone through the mobile network, the SSL certificate wasn't being picked up. I got a nasty Nginx config error. After trial and error I realized that Nginx was set to IPv6. It worked fine on wifi but not on mobile networks. Mobile networks don't use IPv6, wi fi often does. I made the simple change in Nginx.
I have a really nice Drop down Field that is written in Javascript, but not React compatible. I tried to convert it to React but it took too long. I like its filtering feature which Material UI doesn't have. Trying to make your own UI component is too fidgety, especially when its more complex like a drop down list. And testing it is a nightmare. I decided it wasn't worth the effort after spending a lot of time trying to make it React compatible. It never fully worked in React. I went with the tried and tested Material UI drop down field.